Check Image Specs, Convert the Format, Watermark Review Copies, and Compress Only If Sharing Still Fails
Run a simple multi-step image workflow when a file has to clear format rules, review-status rules, and upload limits without forcing the team to reupload into separate tools from scratch.
Open Image Metadata Viewer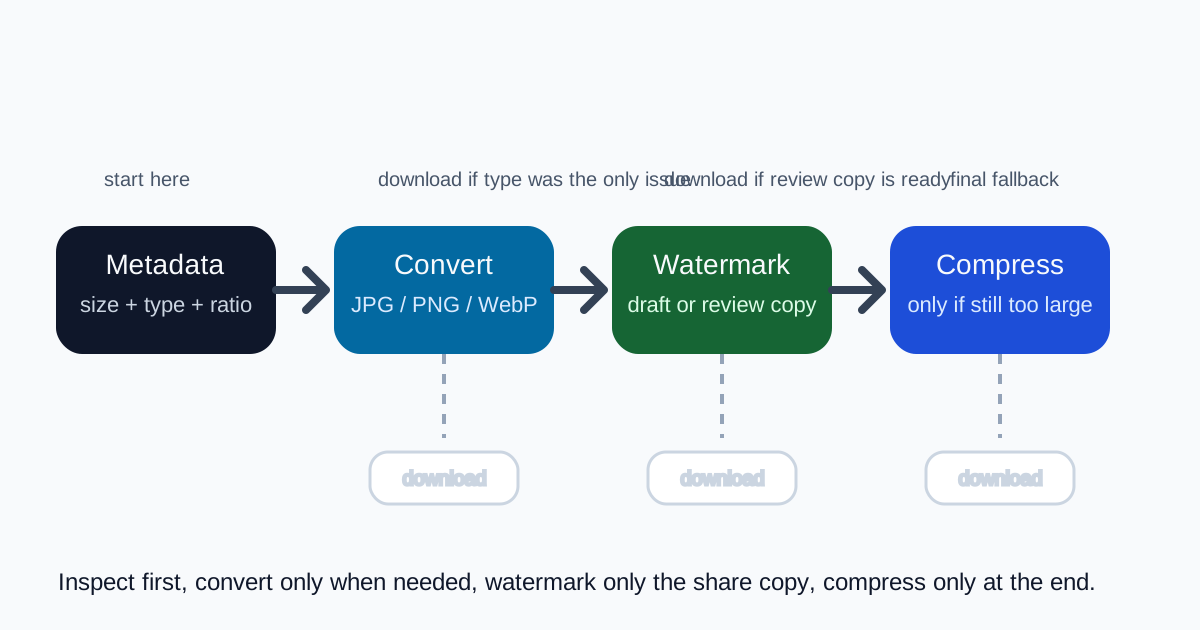
Review images usually fail for more than one reason at once. The marketplace wants JPG instead of PNG, the client proof should be visibly marked as draft, and the final file may still be too heavy for email or a portal. This chained workflow keeps those questions in the right order: inspect the asset first, convert only if the format is wrong, watermark only the share copy, and compress only if the handoff still fails.
The tool order
- Start with Image Metadata Viewer to check dimensions, aspect ratio, and file size before changing anything.
- Move to Image Format Converter only if the current file type is not what the destination expects.
- Continue to Image Watermark when the file is a review copy, draft proof, or internal share that should not circulate as a final asset.
- Finish with Image Compressor only if the now-correct format and watermark copy still fails the real upload or sharing limit.
When to stop and download
- Stop after Image Metadata Viewer if the file already matches the destination and you only needed to confirm the specs.
- Stop after Image Format Converter if the format mismatch was the only blocker.
- Stop after Image Watermark when the review-status mark is the last requirement and the file size is already acceptable.
- Run Image Compressor only when the share copy is correct but still too large for the actual channel.
What to check after each step
- After Image Metadata Viewer: confirm whether the real constraint is dimensions, aspect ratio, type, or file weight before you pick the next tool.
- After Image Format Converter: confirm transparency, sharpness, and compatibility still match the destination's needs.
- After Image Watermark: confirm the mark stays visible without covering the exact detail the reviewer needs to inspect.
- After Image Compressor: confirm text, edges, or product details remain readable in the smaller final file.
Why this order avoids unnecessary damage
Compression is the most common reflex and often the wrong first move. If the real issue is type compatibility or review status, compressing early only adds quality loss to a file that was not structurally ready yet. Inspect first, change only the property that blocks the handoff, and keep compression as the final delivery fix.
Related UtilFlow moves
If the image framing is wrong before any of these steps, use Image Cropper first. If several approved images should become one document afterward, continue into Images to PDF once the final review-ready copies are done.
FAQ
Why start with metadata instead of converting the format immediately?
Because the first useful answer is what the destination actually rejects: size, dimensions, aspect ratio, or type. Once that is clear, the next step becomes deliberate instead of habitual.
When should I watermark the image in this workflow?
Watermark it only when the file being shared is a draft, review copy, or proof that should stay visibly separate from the final asset.
Why is compression the last step?
Because compression is a delivery optimization. It should come only after the file is already in the right format and carries the right visible review status.